Adding decking to your garden can be a great decision that can quite literally revolutionise how you utilise your outdoor space.

From social gatherings to solo relaxation, a beautiful deck area really can change how you enjoy your property and truly enhance your outdoor experience.

However, while the end result can boast all those things, in order to get there, you need to keep a few things in mind.

But don’t worry – we’ve got you covered for just that!


Deck Building Tips

Before you set off down the path to decking decadence, here’s a list of the most important things to consider when building your deck area.


Fit for purpose

The first lesson of deck building 101 is this – purpose. Ask yourself why you want a deck area and what you intend to use it for. This will help you considerably during the planning stages and allow you to create a detailed blueprint of what to include and where.

If you want to create a social spot, you’ll need to create a space big enough to accessorise with the appropriate furnishings, whether it’s an outdoor sofa, a dining table or a hot tub. Whereas, if you simply wanted a spot to light up the barbie, you’ll likely require far less space.

Funding the fun

Next up, is the all-important topic of finances. Naturally, building a decking area can incur a hefty cost, particularly if you plan on creating a large decking area using high-quality materials.

As a result, it’s important to be realistic and know just what you can afford. The last thing you want to do is get half way through a project, only for your pot to run dry.

Work out what deck you can manage financially – including any desired creature comforts you need to furnish it – and work your decking dreams around it.

Grand designs

Designing a deck area from scratch can be a difficult task, even for those with a vivid imagination. With so many variations and moving parts in play, it can be hard to know where to start, let alone how to finish.

Nevertheless, creating a plan of what you want your finished deck to look like is vital in achieving a successful end result. From size of the area to the type of board you want to use, creating a detailed blueprint of what you want to achieve provides a logical path for your project.

A good way to approach this is to complement your home’s design, not to compete with it. If the exterior wall of your house has a contemporary aesthetic, choose a deck that offers the same appeal.

Undercover

If you want an outdoor space that can be enjoyed all-year round, regardless of season and weather, it may be worth considering getting your deck area covered to protect you and your guests from the elements.

For year-round use, complementing your deck with protective shelter can instantly broaden the scope for outside fun, allowing you to enjoy your decking area whatever the weather.

Whether you want to create a shaded spot for the summer heat, an outdoor shelter for the wind and rain or simply a shielded sanctuary for heightened privacy, a roofed refuge can give your decking area limitless usage.

Lighten up

Why limit your outdoor hours to daylight when you could enjoy your decking area at any time of the day? Adding lights to your deck area can instantly alter how you enjoy your decking and allow you to indulge in your outdoor oasis long after the sun goes down.

Whether this is achieved through strategic deck lighting built-in to the deck boards themselves or outdoor fixtures and fittings, such as hanging lights and wall lamps, the addition of appropriate illumination can make the world of difference.


There you have it, five fundamental things to consider when building your deck dream space. For more information on deck ideas, check out our blog section for inspiration or click the button below to get in touch.

Contact Us

Porcelain tiles can provide the ultimate flooring solution for your home, both inside and out.

Beautifully designed, steeped in personality and extremely hard-wearing, they truly make for the perfect base for your homely space.

If you’ve really fallen in love with an indoor tile, why should you be forced to choose a different design for your exterior space?

Luckily, PrimaPorcelain has you covered for just that with our comprehensive range of indoor/outdoor transition tiles.


indoor outdoor transition


Benefits of an indoor outdoor transition

For many properties, space can be at a premium and any inside tricks to increase that space is a welcome blessing.

Using the same tile/paver design both inside and outside can create a seamless transition from your interior design to your outdoor space. It’s also a fantastic way of creating space and instantly opens up each room.

Alternating flooring designs stop the aesthetic flow of an interior design. By continuing the same floor pattern from one room to the next, you can effectively make each room seem bigger by allowing them to flow seamlessly into the adjoining space.

Best of all, this ethos can just as easily be applied to the outside, making your interior design flow effortlessly into the outside and vice versa.


How to create an indoor outdoor transition

The first port of call for anyone looking to create a seamless indoor outdoor transition is the subject of tile design. Naturally, you’ll need to pick the same tile design for both your indoor tile (10mm) and outdoor paver (20mm), so be sure your chosen design is available in both formats.

Once you’ve settled on a design, your next area of focus should be the adjoining border between interior and exterior. For the most effective use of indoor/outdoor transition pavers, it’s well worth investing in sliding or foldable patio doors. This can be utilised to particularly notable effect if you have a level patio.

That way, when you open up the doors, you effectively merge your outdoor space with your interior, creating a continuous pattern with an unbroken design flow that spills out into the outdoors.

Blurring the lines between where the interior ends and the exterior begins provides space on both sides of the coin, regardless of which side you find yourself.

The garden will feel bigger from the outside, while the indoors will seem more spacious from the inside, truly creating the best of both worlds in terms of space.


Things to consider when creating an indoor outdoor transition

It’s important to remember that indoor tiles are more often than not just that – designed for the indoors. As such, indoor tiles are typically not suitable for outdoor use.

In order to create continuity with the same design inside and out, you must first find an indoor tile design that is also available as an outdoor paver.

Sadly, this isn’t always the case and, as a result, not all indoor tiles will be available in outdoor form, effectively putting the kibosh on your indoor/outdoor design dreams.

To avoid disappointment, be sure to check your tile of choice is stocked in both indoor and outdoor forms before you let your imagination run wild. It could help prevent porcelain heartbreak down the line.


Hints & Tips: indoor/outdoor transition

Light pavers have a knack for opening up a space, creating the illusion that your property is bigger than it actually is. For the ultimate space saving solution, combine bright tiles with a level patio and foldable doors to bring your outdoor space and interior design together as one.

Additionally, be sure to keep an eye on the slip rating. If you intend to use your outdoor space for watery fun and games – whether it’s a kid’s pool, a jacuzzi or anything else – a tile with a low grip rating could become a hazard when wet.

Where possible, opt for a tile with a high grip rating for outdoor use. This will provide firmer traction underfoot, limit potential slips and make for a safer surface, particularly after heavy rainfall.


For additional information on outdoor to indoor tile design and transition tiles, call now on 0800 028 8756 or get in touch online using the link below.

Contact Us

AlfrescoPlus products are specifically designed and engineered for low-maintenance durability and long-lasting performance.

That being said, a good buff now and then never hurt anyone and occasional TLC can help keep your deck sparkling spectacularly week in and week out.

For a show-room shine that wows year-round, follow this handy guide on how to clean composite decking.


how to clean composite decking


Basic Cleaning

For optimal performance, we recommend periodic cleaning with a power washer, using a fan tip nozzle. To avoid damaging the finish, we recommend spraying in the direction of the grain with a pressure of no more than 1500psi.


Decking Maintenance Guide

If you want to give your deck a thorough polish to really bring it back to “like new” health, we’ve got you covered for that too.

Here’s a step-by-step guide on how to clean composite decking for a spotless finish that truly sparkles and dazzles.

Prep Work

Before you begin cleaning your deck, it’s important to clear the area, particularly if you have furniture or outdoor accessories that aren’t made of composite material. Splashing these items with a bona fide composite cleaning solution could damage them, so it’s worth getting them out of the danger zone, just in case.

Clean Sweep

A quick once over with a broom prior to scrubbing can prevent the spread of surface dirt. Meanwhile, any accumulated dirt found gathering between boards can be removed by using a wallpaper scraper or a putty knife.

Mix It Up

If you’re using a professional composite decking cleaner, we recommend following the instructions on the product to ensure no adverse effects. However, AlfrescoPlus decking can usually be adequately cleaned using simple soapy water.

Work It

Once you’ve prepped your chosen cleaning solution, you can now get to work on scrubbing your deck. Apply the solution to the deck in 5-metre sections, allowing one section to soak while you work on another. Brush through using a stiff broom to scrub through any obvious patches of dirt.

Power Through

Finally use a jet wash to power off the remaining suds, methodically working your way through the entire deck as you clean, section by section. Once you’ve reached the finish line, take time to stand back and admire your handiwork – you deserve it!


Additional Cleaning Tips

While general sprucing can be easily done using the jet wash steps above, you may find there are some occasions that require a method that’s a little more specialist.

AlfrescoPlus composite decking, particularly capped composite decking, is impressively resistant to a wide variety of conditions; however, there may be the odd occasion where additional TLC can work wonders.

For those instances, try these handy tips below to keep your deck in fighting shape.

Ice & Snow

For chilly occasions of ice and snow, rock salt or calcium chloride can work wonders, keeping your deck safe in wintry conditions. After application, simply rinse with water or mild, soapy water to remove the residue for a frost-free deck.

Tannin, Mildew, Dirt & Grime

Mildew stains can occur due to an excess build-up of debris. Periodically rinsing your deck can prevent this problem from escalating.

Spot Stains

Spots and stains can be a real blemish on your otherwise awesome deck. Clean with soapy water and allow the area to weather for 8-10 weeks to regain its colour.

Scratches, Nicks, Cuts and Grooves

Despite their heightened durability, composite decking isn’t indestructible and abrasions/indentations can occur. Treat damage by brushing in the direction of the grain with a stiff broom. The brushed area should weather back in 8-10 weeks.


If you would like to find out more about decking maintenance or have any further questions about how to clean composite decking, why not drop us a line? Call 0800 028 8756 today to speak with one of our helpful staff or click the button below to get in touch online.

Get in Touch

When the weather is warm, the sun is shining and the clouds are curiously absent from the British skyline, the garden can be the perfect destination for a lazy afternoon of carefree relaxation.

That worriless ambience can be made all the more wondrous if you know how to accessorise your garden with the right furniture.

Give peace (and quiet) a chance with a garden seating area that turns your outdoor space into an R&R VIP room.


outdoor seating area,garden seating area


Benefits of Outdoor Seating

While Mother Nature’s weatherly influence can determine when you enjoy your garden, there are a few man-made factors that are firmly in your hands – namely garden furniture.

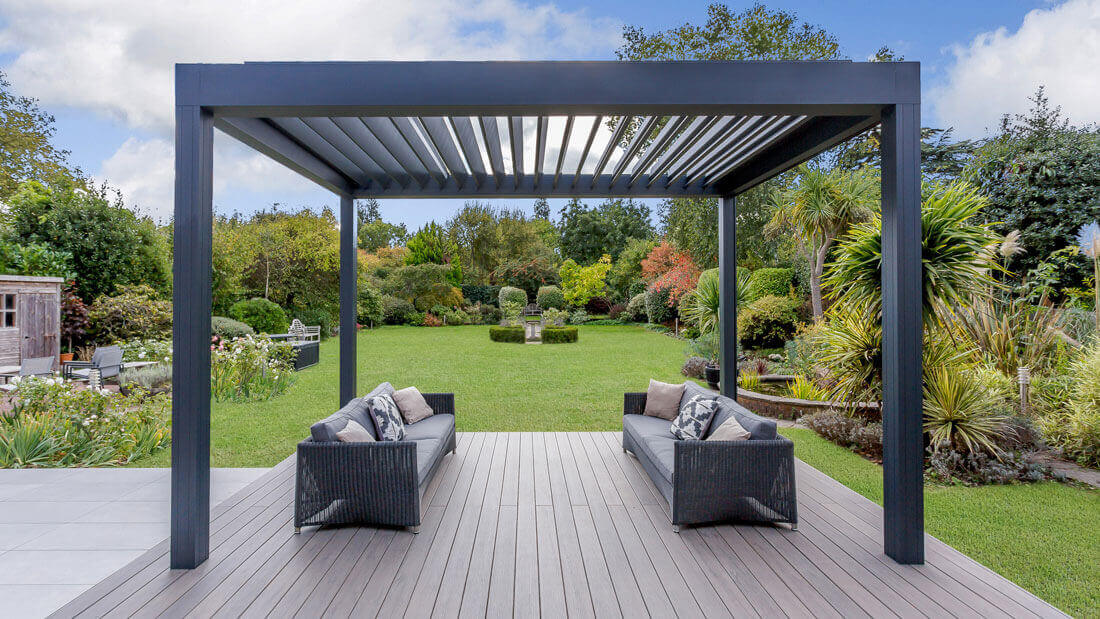
Whether you have decking or a paved patio, the introduction of outdoor seating to your external space can notably improve your outdoor enjoyment.

Better still, not only can it enhance your relaxation, it can also add an instant element of style and fashion to your garden.


Outdoor Seating Ideas

While it’s easy to automatically think of typical garden staples when it comes to outdoor furnishing, there’s so much more to outdoor furniture than wooden benches and metallic dining sets.

Here’s a few creative ideas to help you think outside that box when it comes to your garden seating area.


Hanging Out

If Homer Simpsons has taught us anything – and I think we can all agree, he’s taught us a lot – it’s that there’s no better way to relax in the garden than in the supine comfort of a hammock.

It’s easy to overlook this unusual yet awesome seating option, as many of us will have a pre-conceived notion that your garden needs two conveniently placed trees to support a hammock.

Luckily, this is purely a stereotype created by movies and cartoons. In reality, hammocks come in a variety of forms, including free-standing versions with solid frames for ready-made relaxation.

Whether you choose to go full Homer and rest a frosty beverage on your belly while you do so is your call, but the message remains: hammocks = relaxation

If you want to add a unique sense of luxury to your garden, look no further than the hanging haven that is the garden hammock.


Swing Along

In keeping with the hanging theme of the last entry, swing seats are another great way to relax in your outdoor space.

In addition to the ever-popular swing seats (also known as canopy swings) that have been staples of outdoor relaxation for decades, outdoor hanging chairs have become increasingly popular in recent years.

Bridging the gap between hammocks and traditional outdoor furniture, hanging garden chairs come in a variety of forms, from the cushioned comfort of padded armchairs and sofas to the modern style of all-weather bamboo/wicker chairs.

These dangling seats can be attached to suitable structural supports for sturdy suspension, providing a stylish seating solution that’s also spatially economical.


Bubble Over

Stylishly modern and unashamedly different, bubble chairs and cocoon seats are an instant statement, providing aesthetic allure and human intrigue in one fell swoop.

Uniquely designed and for style and comfort, these unusual seating options make for a memorable addition to any outdoor space. These can also come in hanging form, however, the standing form with a standard base is just as common and just as stylish.

The most common options are the transparent plastic versions and the more traditional wicker variety. For a contemporary, if not somewhat futuristic option, the plastic option is sure to be a crowd pleaser on novelty and curiosity; however, the wicker range is undoubtedly a safer option for long term style.


Cutting Corners

Corner sofas have become a preferred seating option for many homeowners when it comes to interior design; however, why should this stylishly practical furnishing be limited to indoor use only?

Modernised rattan furniture has been infiltrating British gardens with increasing regularity over the last decade or two, with revolutionary new designs cropping up as the years roll on.

One such innovation has been the introduction of the corner sofa to outdoor spaces. Space saving, stylish and superbly comfortable, it ticks a lot of boxes.

Better still, outdoor corner sofas are also weatherproof and tailor-made for socialising, making them a great place for summertime gatherings when the weather allows.


Outdoor Seating Area

Now that you’ve got the actual seating sorted, next up is the all-important flooring. After all, what good is beautiful, expensive seating if the base beneath it is made up of weeds, weathered wood or age-ravaged tiles?

To compliment your lovely, new garden furniture, why not explore the aesthetic awesomeness of garden decking or patio tiles from AlfrescoPlus? Both make fantastic flooring options with their own distinct personality and style, providing the perfect platform for your fresh garden furnishings.

You can even incorporate benched seating into your deck design, with decked benches built into your overall decking design. Built-in deck seating can also double up as a storage area to really make the most of the space available.

Conversely, paving can also work just as well and provide an equally stunning solution to your flooring conundrums. With a huge range of designs to suit your mental blueprint, a paved patio area can round off your garden and make for the perfect setting for an outdoor dining area.

All of our porcelain paving tiles are slip, stain and fade resistant and can simply be wiped clean of spills in an instant. Meanwhile, our decking options also boast these protective features, should you prefer to dine on deck over a porcelain patio.

Whichever material you opt for, decking and patio are the perfect base for stylish furniture. Simply accessorise with garden furniture that features complementary colours, sit back and enjoy!


For more information on outdoor living options, why not drop us a line? Call 0800 028 8756 today to speak with one of our friendly staff or use the button below to get in touch online.

Get in Touch

So, you’ve chosen your design from a wide range of porcelain paving options, you’ve ordered the necessary amount and you’re now well and truly excited about your impending paving.

All that’s left is the small matter of installation.

When it comes to laying porcelain paving, there are two primary routes to go down: the DIY option or the professional path.

If you’re planning on installing porcelain paving in your garden, this isn’t a decision that should be made lightly. Naturally, there are pros and cons attached to each, ultimately coming down to cost vs. quality.

To help guide you through the process to ensure you make an informed decision, here’s a quick rundown of what to expect from each.


DIY Paving Installation

If you have prior experience of manual labour, garden maintenance or tiling in general, DIY installation of garden paving can be a worthwhile endeavour.

Even if you don’t have history in any of the above, that’s not to say that the DIY route is completely out of the question – provided you don’t mind taking the risk and jumping in at the deep end.

AlfrescoPlus tiles are designed for easy installation. While traditional tiles and pavers require mortar and cement, our revolutionary pedestal support system totally by-passes this antiquated approach in favour of our simple, new-school technology.

This allows for dry installation, without the use of any kind of adhesive whatsoever. Not only does this keep the mess to a minimum, it also makes them user-friendly and far easier for a novice would-be paver to handle.

Best of all, the absence of adhesive mean there are no drying periods to wait around for once your pavers are laid. Since there’s no cement or mortar involved, you can simply lay your pavers and begin using straight away.


Tips for Laying Porcelain Paving

If you do plan on installing porcelain paving tiles yourself, there are a few things that are well worth keeping in mind.

Coverage Area

Before you start, calculate the area you will be required to cover by measuring the dimensions of the space. We recommend allowing for 10% waste as it’s inherently common for paving jobs to require slabs to be cut and trimmed along the way for the perfect fit. Meanwhile, it can also be good to have some slabs in reserve, should you run into any breakages along the way.

Paving Gaps

Our tiles and pavers are designed with a very close dimensional tolerance with very clean-cut edges. While this does allow for a tight “architectural” finish, we strongly advise against jointless installation with no gaps as the slightest alteration in settlement can affect the overall aesthetic. Instead, opt for at least a 2mm grout gap between pavers.

Colour Variation

Pavers with an intrinsic colour variation between tiles (such as the Sandstone Grey and the Travertine Grey ranges) are designed to naturally differ from one slab to the next. As such, when you are laying your tiles, it’s worth alternating which pavers you use. Choosing paving tiles from different boxes or varying sections of delivery pallet can help ensure a randomised pattern for a heightened authenticity.

Cutting Tiles

While installation is designed to be as simple as possible, it’s unlikely a paving job will fit perfectly from edge to edge. As such, you may be required to cut certain tiles to make them fit snug from left to right. Be sure to prepare for this eventuality by sourcing the relevant cutting equipment before your start the job.


Professional Paving Installation

While our indoor tiles and outdoor pavers are specifically engineered for simple self-installation, we understand that laying porcelain paving in your property can be a daunting task and won’t be everyone’s cup of tea.

Home improvement can be quite the investment and the prospect of that investment going to waste with a sub-par DIY job can be one that many will want to avoid. If that sounds like you, fear not – that’s where we come in.

At AlfrescoPlus, we pride ourselves on our customer service and providing complete, comprehensive assistance from start to finish is something that we thrive upon. Our expert team of professional fitters are more than happy to help you achieve the paving design you paid to see.

Available in most areas nationwide, our experienced staff are fully capable of tackling a variety of tasks and projects, from straightforward patio installation to complex designs involving additional features, like steps and levels.

From gardens patios and poolside surroundings to balconies and roof terraces, we can handle the hard work so you don’t have to. Simply make the call, sit back and enjoy the results!


For more information on our installation services, why not drop us a line today? Call now on 0800 028 8756 to speak with one of our helpful customer service staff or use the button below to send us an enquiry online.

Get in Touch